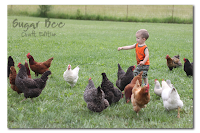
Here’s the picture I want to use as a sample today. It looks pretty good, I’ve got my little boy off-centered so I’m doing the rule of 3rds thing (plus the bottom of the fence and the line of chickens line up on the horizontal line of 3rds). But today I want to delve into giving you a little information so you can utilize Photoshop Elements – with just a little tweak it can be good:
into something great with more pop:
I used Photoshop Elements 7.0. I bought it off of Ebay when Elements 8.0 was released. I picked mine up for $30. For me, it does everything I need it to, without the high cost of full Photoshop. The two things I used most in Elements are Levels and Actions. Today we’ll cover “levels”. Please keep in mind I am noooo expert – this is only for the basic user, from one of us to another.
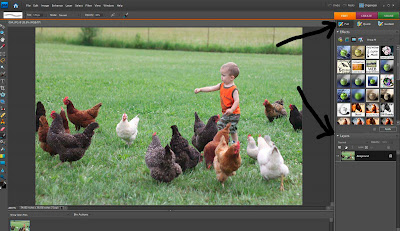
Let’s get started on how to use levels in Photoshop Elements. First open up a picture in the program. Then make sure you are in the mode “full” (not “quick”) – it’s what the top arrow is pointing to.
The bottom arrow in the picture above is pointing at the “layers” section – this is hugely important. You can change things directly on a picture, like brightness, etc, but it is so much better to change it as a level so you can adjust it. Here’s a way to think of layers – you set a picture down then you put a piece of glass over it that makes it brighter, but you can see through the glass to the orinigal picture – if you remove the glass, the picture is still in tack. So now image your picture with lots of stacks of glass on it, each piece doing something like adding yellow tones or sharpening the focus, etc, but even with tons of glass you can still see the original – that’s the idea behind “layers” – they layer on top of the picture.
So click this half white/half black circle (who knows what it’s called) and you get several options of different types of layers you can create. Use “photo filter” to add warmth, use brightness to make your picture brighter, etc. First though I want you to pick “levels” – I was reading a Photoshop Elements book that said something to the effect that almost all pictures, no matter how well taken, can use a little tweak in levels. I love how levels adds depth back in to a picture – brings out the dark undertones. Always start with adjusting “levels” then move on to other things, but a lot of pictures won’t need much else.
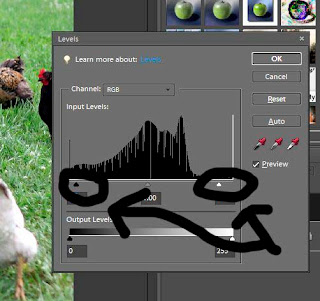
After clicking levels from the dropdown menu, you’ll get a pop-up box. When that’s open you’ll see three eyedroppers – click the one on the left. This will turn your curser into an eyedropper. Then pick somewhere in the picture that’s supposed to be black by clicking on it (in people, creases in their clothes, or backgrounds, etc – in my picture I picked a tail of a chicken).
Did you see a difference? That’s the wow of using levels. Then if you want you can grab the sliders and adjust the picture even more:
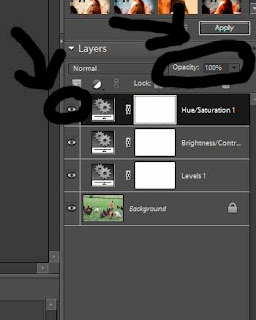
When you’re done with that, click “OK” and it will create a layer called “levels”. For this picture, just to show you it can go really vivid, I then from that first dropdown clicked “brightness” and made it a little brighter (using sliders) and then from the dropdown clicked “hue/saturation” and make it more saturated (intense color) just to show my sample with extreme color. So that gave me 3 layers (it made a layer each time I picked something from the dropdown) and the bottom right of my screen looked like this:
I want to point out the genius of using layers. Say I want to look at my picture with the Saturation – instead of trying to remove it from an original photo that was altered, I can just turn off the layer – do this by clicking the eyeball thing I circled in the above picture. Or say I like it on, but I want to tone it down a little – I can change the “opacity”, aka “see-through-nes” of the layer, so instead of it being 100% strong, click and drag the slider to 50%. Whichever layer you are working on is highlighted in black – so if I want to do this same thing to the “brightness” layer, I would click on it and it would turn black to indicate that it’s the active layer – the one I’m working on.
You’ll get really fast at this – I open a picture and can fix the levels in seconds. Go and try it!
So once again, the before and after:
Thanks for checking out this post from www.SugarBeeCrafts.com – – click on over to read it in its entirety – you’ll love it!











I’m following you now on Blog Hop Friday! Please follow me back on my blog “Inspire!”
My latest inspirational postings are, “The Triumphant Heart,” “Pure Love,” “Peace of Mind,” and “Simple Gesture.”
https://inspiredbyron.blogspot.com/
Ron
Thank You so much. I have had pse7 for over a year and this is a great tutorial. I am now playing with layers! Awesome, thanks!
very nice tutorial…thanks for sharing! following you now from BHF. have a nice weekend!
https://flo-ry.blogspot.com/
Thanks again for a great photo tip! I got photoshop elements for christmas and am just now slowly figuring it out. Can’t wait to try fixing up some pics from the beach today!
OK first let me start off by saying…I love you! I have had photo shop elements 7 for oh about a year or more and have had really no idea how to use it. I just read this post and it has changed my life, yes i tend to be a bit over dramatic at times. But really thanks so much. I am also practicing your photography tips as i have been shooting in the green box ever since i got my new cannon. Thanks so much for sharing what you have learned, you rock!