


I should have given you a heads up sooner, but the Ruffles Event over at Sew Kate Sew just wrapped up – I love following it! And included were a break-in of a pleat week. You can see all the posts over at Sew Kate Sew Ruffles 2012. (I met Kate at SNAP – super nice! I wish I was more outgoing to strike up conversations…)
Anyways, with her Ruffle series coming to an end, it made me wonder if I ever shared my post from her Pleat week last year – and I don’t think I did – oops!!
so, better late than never, I’m sharing my Pleated Headband Add-Ons:
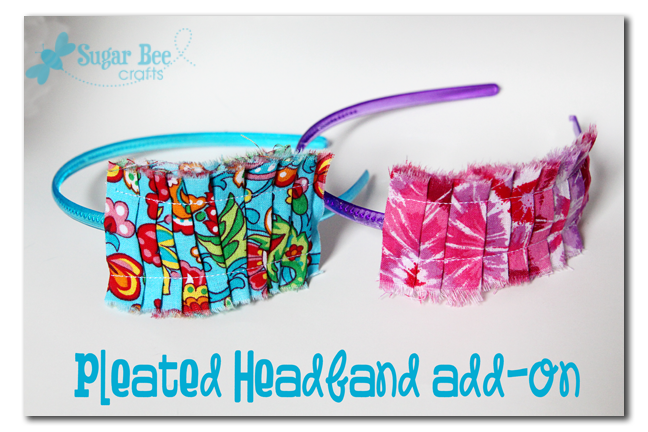
These are so simple, quick, and fun – – they add that extra pizzazz to a boring ole headband. I made them for my girls, but with the right fabric/headband combo, these could easily be worn by us grown-up girls.
Materials needed:
–Cheapo headband (I like to buy mine at the Dollar Tree, where they’re $1 for 6!)
–2 scrap strips of fabric, about 2 inches wide.
–Sewing equipment
Please note – – I made the one in the tutorial with large pleats, but ended up making more with smaller tighter pleats, and those ones are used in the final pictures – either way works!

Take one strip of fabric and fold it into pleats however you’d like. The imperfections and unexactness are part of the charm. Then take your other strip and cut it to match the length of the one with folded pleats:
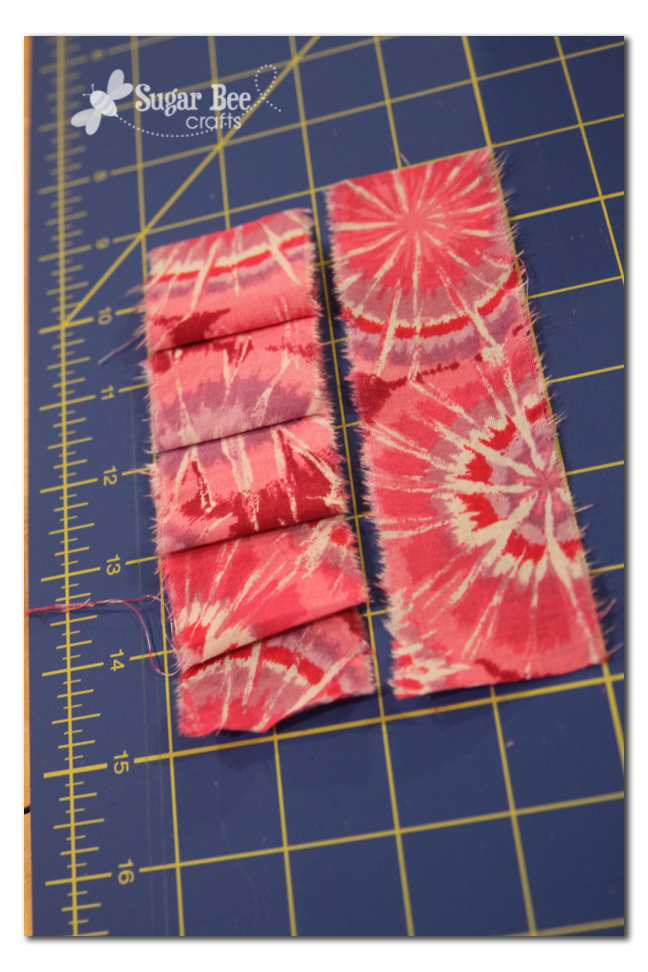
Put the 2 strips on top of each other, with the wrong sides of the fabric together. Sew down each side as shown:

With the two strips sewn together along the sides, this will create a channel in the middle:

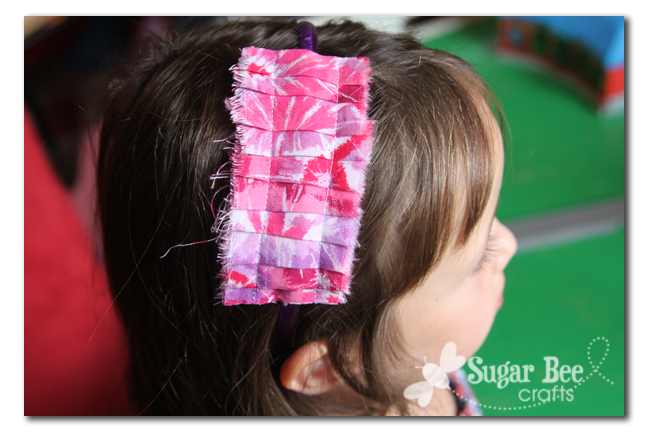
Simply slip the headband into the channel. Then drop hot glue inside each end of the channel to secure it to the headband (I don’t have pictures of this step because I couldn’t work with hot glue and take a picture at the same time!)
That’s it – wear it in style!!
I thought this was fun to post on a Monday – super cute, super easy project – perfect for tackling on a Monday. So grab a couple of scraps of fabric and go try making one!

Thanks for checking out this post from www.SugarBeeCrafts.com – – click on over to read it in its entirety – you’ll love it!
so cute, I think my daughter is out of her headband phase, I loved making woven ones for her. I might have to try at least one and see what she says!!
Those are just darling! I’m going to try to make one for my little niece…she’s such a fashion queen these days!
These are so cute, and such an easy idea i may even have my daughter try making one for herself. Thanks for the tutorial
Oh, these are so adorable! My daughter is just getting into headbands and these are just too cute.
What a darling Idea!
HI Mandy…these are so cute for my Bella…I’m a bit scared of the sewing machine but this looks doable….thanks for sharing and for always providing such great tutorials…xo
Lu
love the pleats – nice break from flowers or bows for the bigger girls 😉
I am definitely going to make some of these.
Too cute! What a great use of scrap fabric!! I would love for you to share this (and any other creations) at Pin It and Win It Wednesday at http://www.cheapcraftymama.com– where you can win free ad-space on my blog!
You always have the greatest kids crafts….now all I need is a kid! 😉 I am able to make them for and with the pieces and nephews- and they love your ideas!!
xo Becca
These are darling, such a great idea. I hope you’ll stop by and add this and any other posts you’re proud of to my Wednesday What We Wore and Made Link party
marissa
https://raegunwear.blogspot.com
What a fun accessory for a little girl! SO cute Mandy.