


Who here got a cutting machine as a gift this year?? Or who here has one that has never used Heat Transfer Vinyl? (even if you don’t have a cutting machine, if you choose a simple design, you can just hand-cut it). I made a cute shirt and want to show you how with a simple tutorial – you can make one for Valentine’s Day, but wear it all year round! (that’s why I picked a gray shirt instead of pink.)

I love all things vinyl and my most favorite is probably Heat Transfer Vinyl – it’s just so fun to make custom shirts and more. I’ve done a Heat Transfer Vinyl (or HTV, if you’re hip with the lingo) tutorial before, but I know that lots of you just got a vinyl cutting machine over the holidays, so I want to do a quick tutorial to bring you up to speed.
(I know what you’re thinking – “she’s wearing peeptoe Toms in the snow?!” – don’t worry, it was just for the picture – I was really wearing pink fuzzy socks and slippers, but it wasn’t quite the “look” I was going for)
Heat Transfer Vinyl is exactly that – vinyl that transfers with heat. You heat it up (with an iron) and it “melts” itself onto fiber like tshirts or canvas bags. My most favorite are the GLITTER HTV – because glitter makes everything that much more awesome. And my most favorite place to buy vinyl is Expressions Vinyl – it has the most selection for the best deal (yes, that’s an affiliate link, but yes, they are my go-to when I need to buy vinyl).
Okay, here we go! Pull up your image in your Silhouette Software (I used the word “love” that I found in the online store because I liked the way it flowed, but you could just as easily type the word out using any font on your computer). Then, this is the most important part – MIRROR YOUR IMAGE! HTV is different because you cut from the backside, so whatever you cut needs to be set up backwards. To do this make sure your image is selected then go to “Object” and pick “Transform” from the dropdown, and then pick “Flip Horizontally” from that dropdown:

And then it should be backwards, like this:

Once you’ve done that, you’re ready to cut. Send it to your machine and set the settings to HTV (I use the “flocked” setting for the glitter HTV since it’s thick – regular heat transfer vinyl is the “smooth” setting). When you put your HTV on your mat, make sure the side with the clear sheet on it is facing down. Again, you’re cutting into the backside of the vinyl.
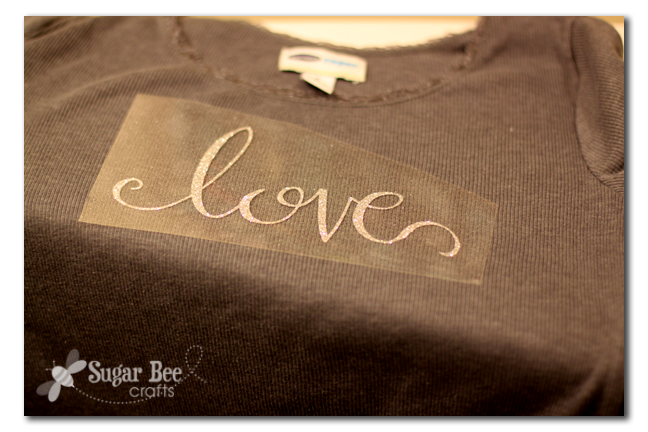
After you cut your shape, simple peel out and “weed” around your image. You want to leave your design attached to the clear sheet and peel everything else off. Then just place that on where you would like to attach it:
And heat it up. I use a cloth in between my vinyl and the iron to make sure there’s not direct contact. Then I just push hard on the iron and iron it for about 30 seconds.

Let it cool for about 30 seconds, then slowly peel away that clear sheet – your HTV design should stay behind, adhered to the shirt. At this point, I like to iron it down one more time to make sure I have it secured enough. That’s it!!


Sooo cute! I need one of those machines—like NOW! 🙂
Do you remember what font this is I love it..
it’s actually an image I found in the Silhouette online store, so I didn’t use a font – – sorry!
Love the font too! I’m not having any luck finding it in the Silhouette store. Could you provide a link?
Thanks!
I wonder if it’s not available in the store anymore???
One of the (many) mistakes I made when I first started doing HTV was not mirroring the image, especially when it came to words. I learned pretty quickly not to do it again, with too many wasted t-shirts. Thanks for sharing the tips.