You love snow globes, but not the generic figurines inside? Then check out my tutorial on creating your own!
Hi, I am Yana, over from my blog InDIYvidual where I post artsy and craftsy stuff like this tutorial. Jump over for a visit anytime you want!
First, a big thank you to Mandy for having me – I am mega excited about doing my first guest post ever!
For this snow globe, you need:
– a bulbous empty jar – fitting the size of your figurine. Be sure to check out it fits tight and won´t
leak water later on!
– a small toy doe
– a leftover piece of cozy fabric and some white fabric
– oven drying “clay”
– aluminium foil
– a white candle
– a small twig – water
– instant glue, a black pen & scissors
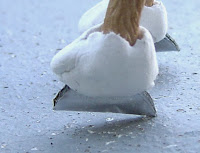
1. I started by forming the ice skates: Cut out four small rectangles of metallic foil (about 0,5 x 1,5 inches). Fold them up into tiny rectangles and cut off two edges. These are your blades.
2. Take the clay, put it around the hooves and try to form an approximatly shoe-like form. Press your metal rectangles into the clay to create a groove.
3. Let the shoes harden in the oven. Meanwhile, create the scarf by cutting out a 0,5 x 2 inch piece of fabric. Use your scissors to create fringes at the ends by cutting into them repeatedly.
4. When the shoes are dry, use your black pen to draw shoelaces: Stip three dots on each side of the shoe and connect them with a slim line. 
5. Take the instant glue and glue the blade to the shoe and the shoe to the hoove.
6. Wrap the scarf around the doe`s neck and fix it with some glue. We wouldn´t want the poor darling to freeze in all that snow, now would we?
7. Cut off a slab from your candle, and glue it do the lid. This will serve as a frozen lake and lift the doe to the right heigt. If the lid doesn´t close anymore, scrap off the too large edges with a sharp knife.
8. Use a nail to drill a small hole into the candle and glue the twig in. Then, glue the doe onto the “lake”. If your glue won´t hold on to the candle, paint it with acrylic paint and do your glueing when it has dried.
9. Cut the white fabric into tiny squares. The easiest way to do this is by making parallel vertical cuts and then cutting horizontally. This will be the snow.
10: Now it is all coming together! Fill the jar with water and throw in the “snow”.
Small note: When I researched how to make snow globes, it always said to mix glycerin or baby oil with the water to make the snow (glitter or crushed eggshells) fall slower.
I tried it all – total failure.
The glycerin made streaks in the water so the doe could barely be seen and the eggshell fell down immediatly anyway. The glitter just floated on top, as did the baby oil. Using pure water and the slightly floating fabric made for the best results. It does not float quite as long as the commercial globes, so if you want that, you might have to buy a diy set where you only make the figurine yourself.
11. Close the jar. It is ok if some water is squeezed out, that´s better than to have a large air bubble at the top later on. If your jar leaks water, glue it shut with a hot glue gun.
 12. Wrap the lid in a piece of fabric. And voilá, your personal snow globe is done!
Mine will be a chrismas gift to my grandma. I made another one keeping with the idea of toy animals for my mom.
You can get as creative as you want, but remember: only use WATERPROOF materials! Sounds logical, but I still messed up on that point with my clay and pen the first time round, so I thought I should point it out…
Liked it? I would love to see you at my blog InDIYvidual!
Come and check out my fairytale inspired picture or my upcycled candleholders.
Also, I have an advent calendar going on right now with a surprise tutorial every day!


