


Here ya go – – a Tutorial on how to make a Birthday Board! I guess it’s about time I do a craft post for ya – I’ve enjoyed the break but am ready to show you some things that I’ve been up to – and I’m sure you’re ready to read actual craft posts, since this is a craft blog and all 🙂
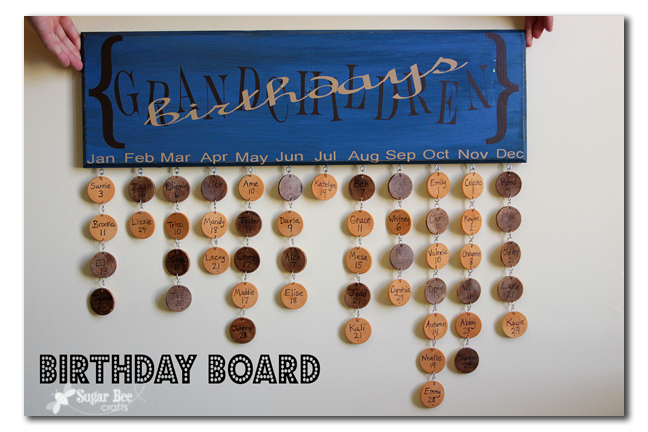
I made this Birthday Board for Trevor’s mom as a Christmas gift – Trevor is one of 9 kids, so there’s a lot of them! Instead of doing the whole family’s birthdays, I just did the grandkids and great-grandkids.
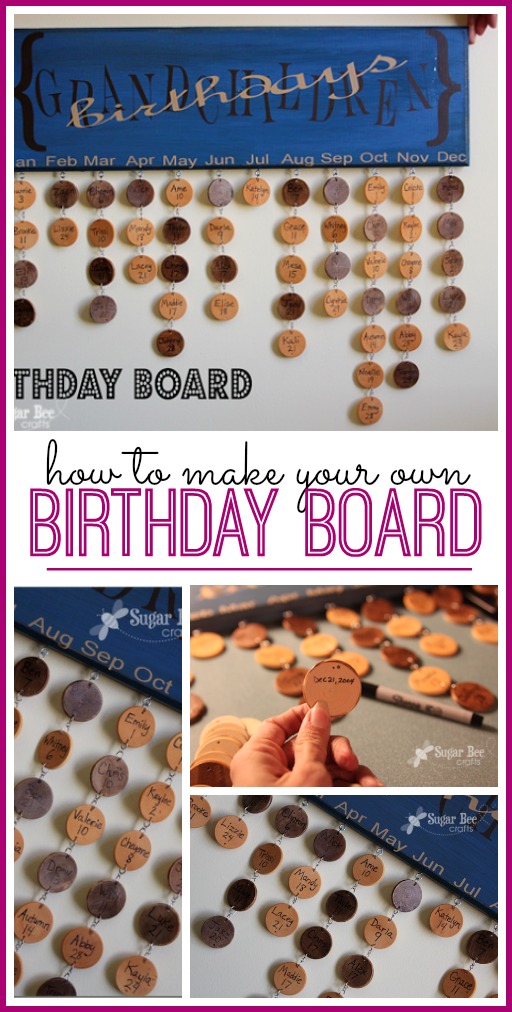
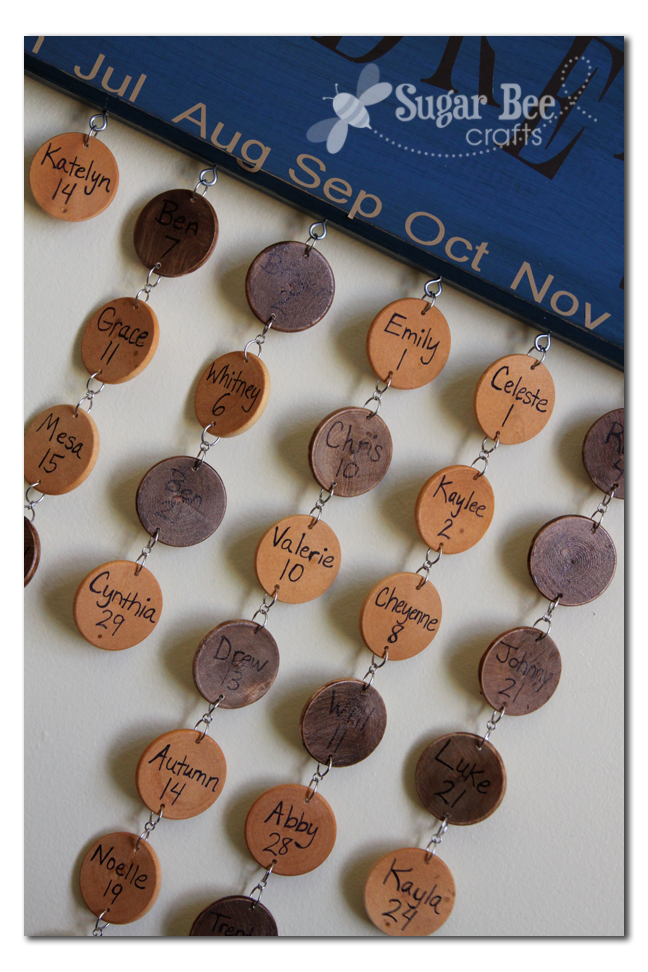
The way it works is each disk represents a child. The number on the disk is their birthdate. So for example the very first disk says “Sunnie 3” – so it’s for Sunnie, who was born on January 3rd. It’s interesting to see the pattern laid out – tons of Oct and Nov birthdays, and only one in July – who knew!
You can search google or pinterest for “birthday board” and come up with lots of different ideas and variations. My friend Michelle noticed I pinned the board and said we should make them together – I love when people whip me into shape!
Birthday Board
You’ll need:
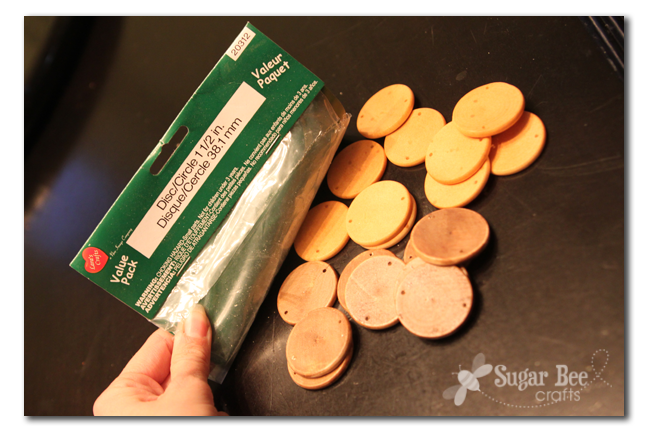
—wooden circle discs (these ones come predrilled!!)
I liked the one with the wooden circle disks, and I found them in a bulk pack at Michaels – here’s the package bag in case you go to look for them. Then I had Trevor drill a tiny hole in the top and bottom of each disk. UPDATE: you can just buy these ones from Amazon and they already have the holes predrilled – awesome!!
Then I stained them with some wood stain I found in my garage – half dark (for the boys) and half light (for the girls).
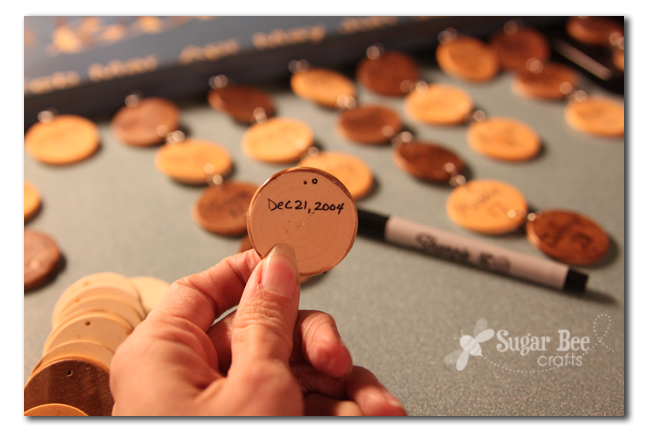
I originally thought I’d print everyone’s name and year in vinyl for each disk, but in the end that sounded like it was going to take too long, to layout each name the right size and weed out all the letters, etc. So I went the easy route and just wrote on the name and date with a fine-point sharpie pen. I wrote the whole date (including the year) on the back:
There are tons of ideas on how to hook everything together. I went with jump rings, which are little circles used in jewelry making. They have a slit and you just open them up, slide them through the hole in the disk, etc. To make sure they all face the same way (so they don’t twist sideways), you’ll need a tiny jump ring inbetween the jump ring on each disk. I think you can see that in this picture if you look close:
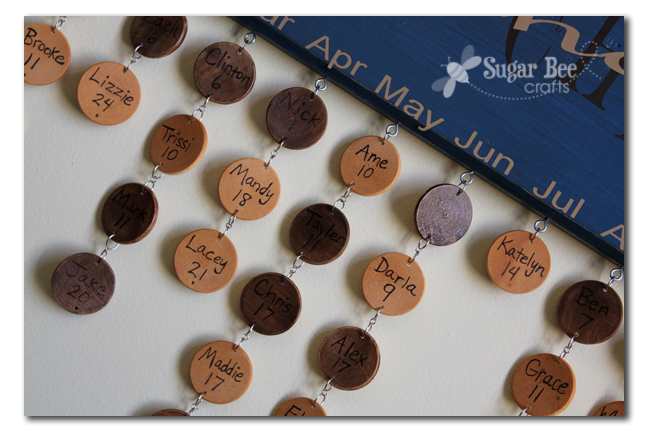
Then where they hook to the actual board I used eyehooks, which are little screws with an open circle on the end.
The dark stained disks are readable in real life – in the pictures it looks like they aren’t, but really they are. I used my Cameo to cut vinyl for the months and the saying “Grandchildren Birthdays”. I really like how it turned out!
Since it’s not actually for my wall, I didn’t want to make holes in the wall to hang it just for pictures, so I had Trevor hold it – that’s why there’s hands in the picture 🙂 Normally it’ll hang all on it’s own!
So go ahead and grab a discarded board and whip yourself up a birthday board. It makes a great gift but I also kind of want to make one for myself 🙂
And if you love VIDEO TUTORIALS, I have those too!
What a cute idea! I pinned it for future reference. I’m lucky enough to have 4 parents (bio and step), and around 20 aunts and uncles, so a birthday board would be a great way to keep track of all the family birthdays!
I have been trying to figure out a way to connect them and the jump rings are perfect! Do you mind telling me the sizes you used? I just love it!
Hi Nightime Crafter – – your email isn’t linked so I can’t reply that way — so hope you see this….
Anyways, I’m not very helpful on the sizes – I just bought a multi-pack of jump rings from walmart, used the biggest ones to connect to the disks, and the smallest ones inbetween. I don’t think exact size will matter – good luck!
LOVE THIS! I so need to make one now!! Thank you for sharing this wonderful unique idea!
I really like this idea…I have a really hard time keeping up with everyones bdays in our family…this would really help!
OHMIGOSH! I am totally doing this for my Grandma’s birthday. LOVE IT!
That is an amazing craft project!! How fun to have that hanging on the wall. 🙂 Love this!
What an awesome idea for grandparents!! Thanks for sharing!
Oooo! I love it! I’m totally pinning this. I love how beautiful it turned out!
What a clever idea and how beautifully made.
What a fantastic idea. Our family are having a handmade Christmas this year so I’m getting organised early with this project. Thanks Mandy
Love that idea!! It’s so simple yet effective. Yet another thing to go on my to-do list 😛
What an awesome idea! I love it!!
Did you know that you can also make a Tuit out of the round wooden disks? All you do is paint or stain them and write “TUIT” on them and you have A ROUND TO IT”. I used to have one, but lost it.
Oh my gracious me!
This has got to be the cutest, most stylish ways of remembering birthdays EVER!
Definitely pinning it!
Thanks SO much for linking up your awesome posts @ Feature Friday Free-for-All!
~Abbie (www.fivedaysfiveways.com)
This comment has been removed by the author.
how long is board? need to fit all months and circles!
how much do you think it cost for supplies?
Hi Kelley – – it’s 18 inches – I’m sure you could made any size work, as long as it wasn’t super small.
Cute idea! I need to make one for my MIL
I have that same inspiration board pinned. Thanks so much for the tutorial!
Mandy I love your ideas.. And like always this is a fab one too.. 🙂
Thanks for sharing
Love
Hani
Awesome birthday board Mandy! Perfect gift! Thanks so much for sharing!
I think this is a really great idea and plan on making it for my mom for Christmas (we have a *huge* family, so I know this would help out plenty!) I was wondering if you could tell me what size the main piece of wood that is holding everything up is as well as the type of wood that you used. Also, did you think that using stamped letters for the header board would work out and look good as a finished product?
Thanks :o)
Love this idea! Thinking it might be fun to try with ‘s’ hooks instead of jump rings so you could keep them in order whenever someone new is born. Definitely know what someone is getting for mother’s day now.. 🙂
I’ve already given it to my mother-in-law, so I can’t measure it for ya, but I think it was around 18 inches long. I’m not sure what type of wood it was -just something grabbed at Lowes. I would think stamps would work, but haven’t tried it. Good luck!!
What a wonderful idea. Well done!
I LOVE THIS!!!!! I am def going to make this for my mother in law! So awesome! EEEEK!
take a peek at my place, theres tons of diy
borntobeblonde.com
Clever idea!! I’ve got to do this. I also love your rag rug tutorial. I haven’t crocheted for a long time but love sitting on the front porch in the evenings to crochet and listen to the quiet!
Hi! I am the original creator, and the link does work now! https://www.etsy.com/listing/48745544/the-original-birthday-board-reminder?ref=sr_gallery_10&ga_search_query=birthday+board&ga_view_type=gallery&ga_ship_to=ZZ&ga_min=0&ga_max=0&ga_search_type=all Thank you for your interest.
I’ve been wanting to make one of these for a while.. I like yours the blue and black.. Very nice.. I was looking into purchasing a cameo, those are expensive little suckers! Would you be interested in selling me some customized lettering???
I was thinking using scrapbook Lettering! Maybe you could also? Then I was going to paint clear coat over it to give it a nice look & seaal the scrapbook pics 🙂
I’m not up for selling lettering but I’m sure you could find someone on Etsy to do it for you – – good luck!
idea bellissima!!!
grazia
awesome!! Thank you so much! I’m making one of these for my mother in law for Christmas. My husband is the oldest of 7, with most of his siblings married & having children now, we have a HUGE family!!
What size jump ring did you use?
I can’t remember which size jump rings I used – I don’t think it matters too much, so whichever size you’d prefer…
What is the tool called that hooks the metal eyelet thingy onto the bottom of the board? I want to make sure I buy the right stuff… thanks : )
they’re called eyehooks, and there’s a little screw actually hooked to the eyelet thing… good luck!
I love this birthday board! My aunt loves to keep up with everyone’s birthdays and anniversaries. She calls our local radio station to have them announced. She will absolutely love this. Can’t wait to give this for her 75th birthday!
I love this birthday board! My aunt loves to keep up with everyone’s birthdays and anniversaries. She calls our local radio station to have them announced. She will absolutely love this. Can’t wait to give this for her 75th birthday!
This is such an amazing idea. I do pretty good about remembering birthdays but there always seems to be a few that slip through the cracks. This would be fabulous to give out on Mother’s day to grandparents! I would love it if you could link this wonderful post up on Thursday @ Great Idea Thursday’s https://ahandfulofeverything.blogspot.com 🙂 Krista
Great idea!
Oh my you did an awesome job on the project and tutorial! Thank you so much!
Everyone on FB is going gaga for this! I want one but am not a crafter whatsoever! You need to make this your business. You will ake a lot of money!
You said in the article that there are other ways to connect the disks other than the jewelry rings. What are some of the other ways? I am going to try to rings but wanted to see what others have done?
Great idea! I need a way to track birthdays so I don’t forget. :/ Thanks for sharing! Stop by my Friday’s Five Features tomorrow and link up this post (and others)! https://diy-vintage-chic.blogspot.com
Love the birthday board. Will be making 15 of them for family Christmas gifts. My question is “What did you use to write on the board, both the subject and the months of the year?”
Thank you.
I have a craft cutting machine (Silhouette Cameo) that cuts vinyl, so I used vinyl stickers for the words. You can try freehanding it as well, just be sure to plan out your spacing. Good luck!
Could you please Tell me how high the Board is and how tall and wide the Months are , I am trying to work out how to get the Vinyl the right Size to fit , thanks heaps
sorry! I gave it as a gift, so I don’t have it anymore to measure it for you
Out of all the ones I’ve seen you gave fantastic intstructions. Thanks!
Use a fine tip Sharpie to write names and date of birthday or anniversary. Drill small holes in the painted shapes and insert the oval jump rings to attach to the Cup hooks and other shapes.
What size are the vinyl lettering
it will depend on the side of your board – hope that helps!
I know that you don’t have the board anymore, but you wouldn’t happen to know what size the eye hooks and jump rings are?
sorry, I’m not sure – I think they’re just standard eye hooks, and I’m not sure about the jump rings. Maybe I need to make a new one so I can make note of those things!