


So I’m wandering through Walmart and see a whole display of these:

Can you see the clearance sticker?? it says $1.00 – what?!? Of course, I buy like 15 of them. The only problem, I only got a couple in small sizes, and my girls are in small sizes – the bulk of them are size 10/12 (my girls are 4 and 6). But that’s okay – an idea started forming when I thought of this mess:
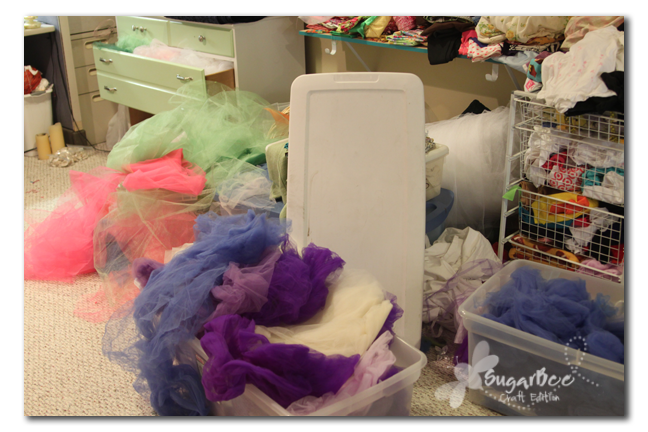
That’d be my craft room, exploding with tulle. There’s even more not pictured. It needs to be used – obviously! So I thought it’d be cute to make Dress-Up Shirts – and so I did.
Dress-Up Shirt: a regular shirt, but looks semi-like you’re dressing up – but it’s worn as a regular shirt – but girls think they’re dressing up – but you can get them out of the house without being in an actual dress-up outfit.
So let’s begin on the tutorial:
–Get a shirt that’s too big – that way it’s kind of long and tunic-y. Looks great with leggins. A couple of problems with a shirt that’s too big – it’s too wide. So just turn it inside out and sew the side seams in smaller – I went in an inch on each side. In the picture below the part of the shirt you see is the sleeve – I just started at the bottom of the shirt and came clear out through the sleeve.
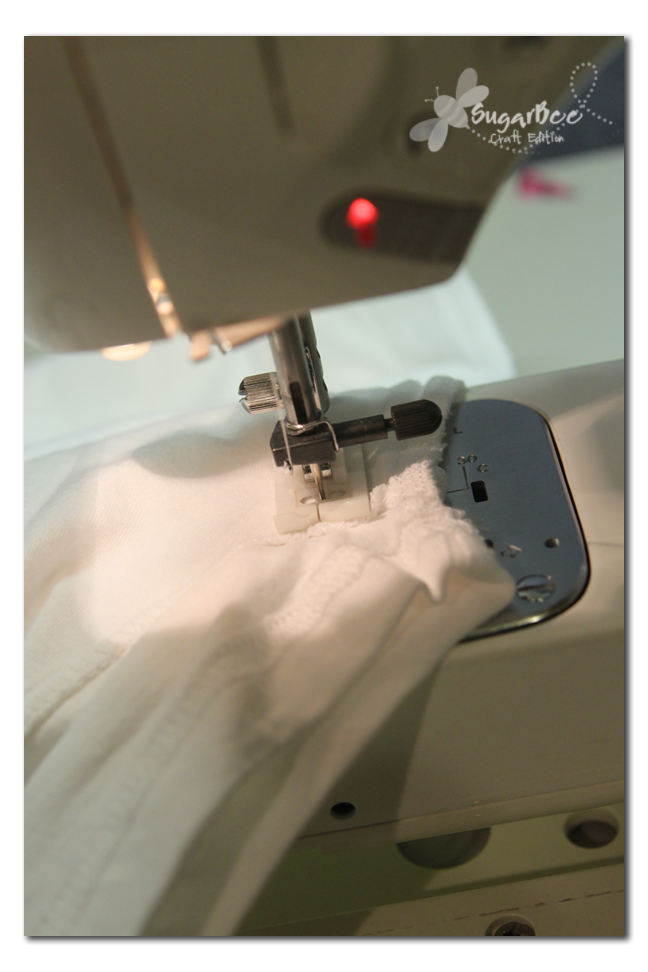
Next, on a big shirt, the neck will gape open , so I just created a pleat on each side. Just grab a hunk and fold it up on itself and sew in place – do that near each shoulder.

Alright, the shirt is prepped and ready. Moving on. I cut a long strip of tulle and folded it in half. On the raw edges side I ran a gathering stitch (long stitch) and pulled the string so it gathered. I did this in pink and green. The green was a wider strip (not on purpose – oops). You can see in the picture how the bottom edge of the tulle is a clean, folded edge:


Mark your shirt where you want to attach the tulle – this is important because when you’re sewing it’s a big mess of tulle and you can’t tell what’s going on. I used that blue disappearing fabric pen and dotted it all around the line I wanted to sew on:

Then put your tulle on top of each other and pin it to the shirt. Sew over your gathering line. If you want it to look nicer, when you’re done, pull out your gathering stitch.
For the letters I tried using my Silhouette to cut the names but I think I didn’t do it right – it scored all the fabric and then I cut the letters by hand. To cut letters by hand, just iron heat n’ bond/wonder under stuff to the back of your fabric – then cut it out:
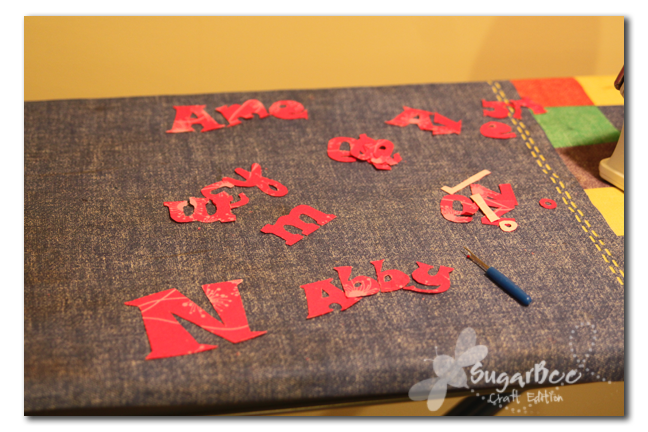
Then peel the backing off – it should leave a glue-ish layer – iron the letters on to your shirt and the glue should stick them down. I had to iron them at the waist because the neckline on these shirts is gathered, so that wasn’t an option.


For extra stability, I sewed on top of the letters so they wouldn’t get pulled off – I don’t think that’s a have-to.
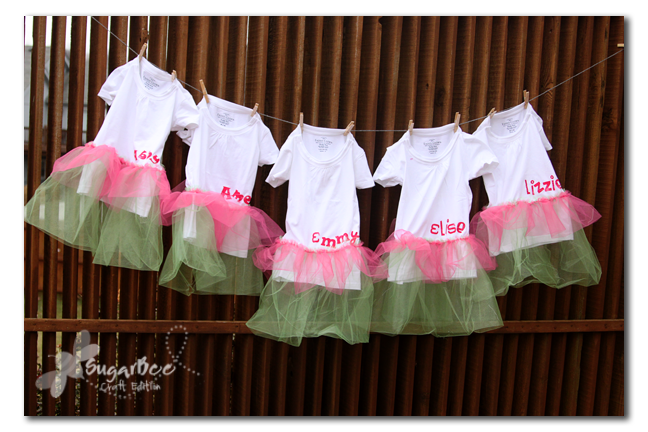
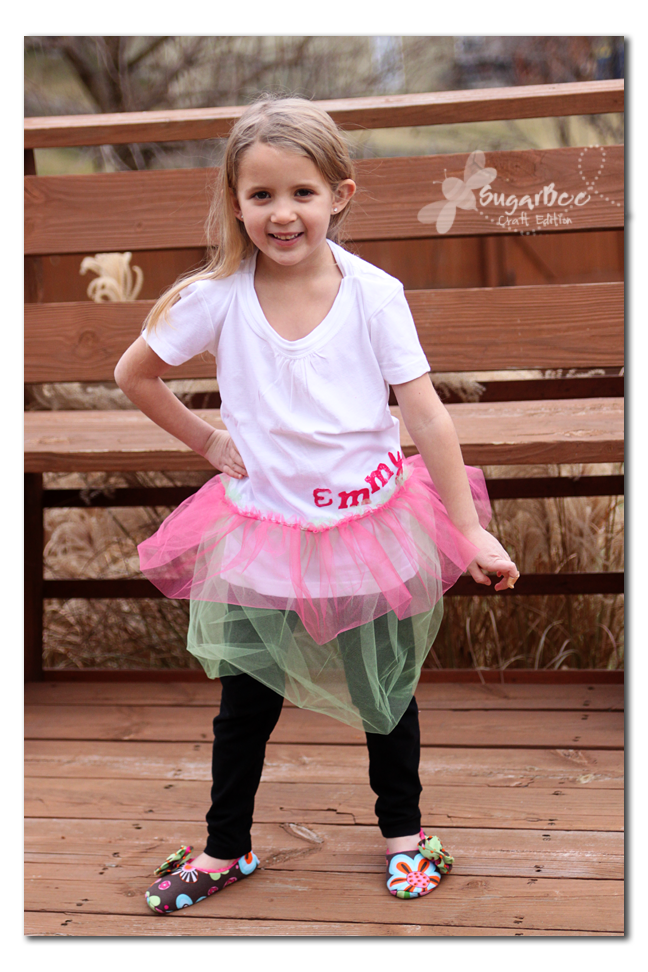
That’s it – stand back and enjoy your work:

I think they’d be cute with some tulle flowers around the neck, but I made 7 of these (for matching cousins) and was done with them, so I didn’t add any embellishments.
I think the green layer is too long and I might end up giving it a trim – what do you think on that??
Put on some leggings and do a photo shoot in the freezing cold 🙂

I am giving away a kit to make one Dress-Up Shirt over at Twelve Crafts Till Christmas – maybe you can win it!
If not, no big deal – you can still make one. You can do it!
that is the most stinking cute thing I have seen in a while…I am heading to wally world while everyone is asleep to see if we have them on clearance because heaven knows I have tulle!
Those are so cute! I don’t think they are to long at all. Plus the girls can grow a little a still wear them. GREAT JOB!!
Such a fun, quick idea!
So Creative and Fun!! Nicely Done.
CaYute! *jill dreams of having a sewing machine*
ridiculously CUTE!
That is such a great idea! Thanks for the how-to, I bet I’ll be seeing this at a ton of future birthdays! I’ll be spreading the word.
These are so stinkin cute! Can’t wait to whip one up for my princess! Thanks for sharing and linking up to Fantabulous Friday!
That is such a cute idea to have it on a t-shirt. My daughter would love this!
That is such a cute idea to have it on a t-shirt. My daughter would love this!
ADORABLE! Thanks for linking this up! I love it. The shoes are so cute! Where did you get them? It would be fun to add a 3rd color in there, instead of trimming the green….well, I think it would be fun! But, it looks marvelous. It seems to be a hit with the girls, too! Great job.
OMG! You and I shared a brain on this! I brought home a stack of these clearanced shirts with a very similar idea in mind! I can’t wait to be able to link this post to it when I get to them…
These are absolutely adorable! I hope your girls love them!
Thanks for linking up to Making It With Allie! I can’t wait to see what you have for next week!
AllieMakes.Blogspot.com
Way cute idea!! My girls are the “have to wear a dress” type and so I may do this with some of their t-shirts they don’t wear because they don’t have a skirt to go with it.
Thanks for posting this!!
What a great deal. Lucky you! I love your idea, my nieces would love to have these!
https://www.amaskellantics.com/
You know I’m a fan of yours! You’re so crafty!!!
Miranda
http://www.justdrinkacoke.blogspot.com
See you at your link party tomorrow!
Don’t you just love how creativity comes to mind when you are shopping? 🙂 I love it!
I love meeting kindred crafting spirits. 🙂
Hope you come by to say hi.
Cheers!
Jen
https://cariboobutterflycrafts.blogspot.com
These are sooo stinkin cute! Love that each one is personalized too and the price tag is unbelieveable! Love it.. thanks for sharing with the Pink Hippo Party!
Those are so much fun!!
So glad I won!! Just wanted to let you know I got the package and will be making this this week.
Thanks!!
Awesome. Seriously awesome.
oh my gosh i love these!!!!!!! i especially love the one that says Emmy. thats my daughters name we just spelled it Emmie. 🙂 i have not seen something that has said emmie or any spelling yet. cool