


I’ve got some exciting news – a new series here on Sugar Bee Crafts – photo tips!! Thanks so much Lizzie – can’t wait to watch and learn from all you have to share! Be sure to check out Lizzie and her site and blog, and look forward to seeing her posts, one or two a month, on Fridays.

![]()
Hello! I am Lizzie from The Dancing Toad Blog and owner of Dancing Toad Photography and I am so excited to be posting here today! I was thrilled when the fabulous Mandy asked me to start this series on the Sugar Bee Crafts blog!

I will start with basic stuff, the little things that make all the difference when taking pictures.
If you have any suggestions or questions or you would like me post about a specific topic, please let me know. I would love to do whatever I can to help you improve your photography skills!
Today, it’s all about lighting.
Lighting lighting lighting.
Good lighting is key to a good photograph.
If you have natural light, use it. Avoid using your flash if the lighting will permit. Even with an indoor studio and all our fancy lights, I prefer to shoot outdoors (or near window if I can’t go outdoors) and take advantage of all the natural light that I can.
Keep in mind the location of your light source.
The location of your light source and the location of your subject can often be even more important than the actual type of light you are using.
If you are near a window or outdoors and your light source is behind the subject, this can cause your subject to be too dark.
For example, this is a picture I took of my son. There is no flash and the window was behind him.
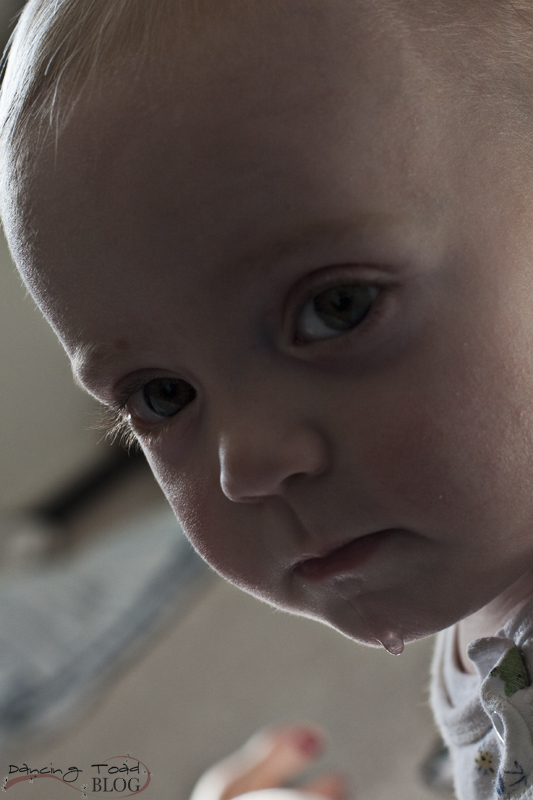
1/125, f/5.6, ISO 500
So.. I moved slightly, had him face the window and I stood with the window behind (and slightly to the side of) me…

1/125, f/5.6, ISO 500
I shot manually (more on shooting in manual later) and my camera settings were the same in both images.
It’s all about the angle and the natural light!
It really is amazing how much your photographs can improve when you spend a few extra seconds noticing the little details instead of just snapping a picture.
Be sure to come back next time for some more photography tips!
In the meantime visit me over at The Dancing Toad Blog.
Also.. if any of you would like to e-mail me your pictures after you have applied any of my tips, I would love to see them and I might even share them on a future post!
Thanks for checking out this post from www.SugarBeeCrafts.com – – click on over to read it in its entirety – you’ll love it!
Great tip! Bay windows and picture windows work great with for this. Porches as well as a sunny afternoon when the light isn’t too harsh, or your subjest will be squinting. I look forward to seeing more of these from you!
Tina
ariiaana.blogspot.com
But you won’t get SOC images like that. That was oversharpened in photoshop. 14+ yrs of photography speaking.
Samantha, thank you for your comment. You have a nice eye.. yes, both images were lightly edited in the exact same way. The point of this post was to give lighting tips. Thanks again, I always appreciate comments.
I should clarify that when I said they were both lightly edited it was just some sharpening, that’s all.. the brightness/exposure of either image was not altered in any way..
Thanks!
Lizzie, I am excited to hear some more of your tips! Thanks for the pointers on lighting!