First I need to thank those of you who responded to our Adoption post last time!
You are fabulous.
You are fabulous.
From here on out if you want to follow our adoption story head on over to The Dancing Toad Blog! Over there you will find a link to our agency adoption profile (right sidebar) and you will see how we’re coming along in this long process.
Now for the photo tip of the month!
For my last photo tip post I gave you tips on improving your family pictures and I shared ways to help you have more successful family photo sessions with your own families.
Well, today I’m going to give you a tip that will help you when your family pictures are already taken.
Ever have a bunch of family pictures that look pretty good except for the fact that in every picture at least someone in your family has their eyes closed, is looking rather awkward or just isn’t looking at the camera?
With the info from today’s post, you can swap out the awkward head for one from a similar picture where they are smiling or at least looking somewhat normal.
First I need to tell you that I am not a pro with Photoshop. There might be better ways to do this. This is the way I do it and it’s always worked great for me.
I am using Photoshop CS5 but I think the steps are the same or similar in previous versions.
Here are 2 pictures from a recent session:
Everyone looks pretty good in the one above, except the one girl who’s eyes are closed.
So, I looked through the other images and found a very similar picture where she has her eyes open.
I will take her head from this image and put it over her head in the first image where her eyes are closed. It’s very important for me to pick pictures that are very similar because this makes it much easier to swap heads. Taking a head from an image that is completely different takes a lot longer and is something that is meant for much more skilled Photoshopers.
Open both images in Photoshop at the same time.
Go to the image that you are fixing, for me it’s the one with her eyes closed. Then create a new layer. (Shortcut: Command J on a Mac, CTRL J on a PC) This step isn’t necessarily required but it makes your life a lot easier later as you can just delete the layer and start over if you make a mistake. You can also click on the EYE just to the left of the new layer after you are done to turn the visibility off and on to see your image before and after your edits.
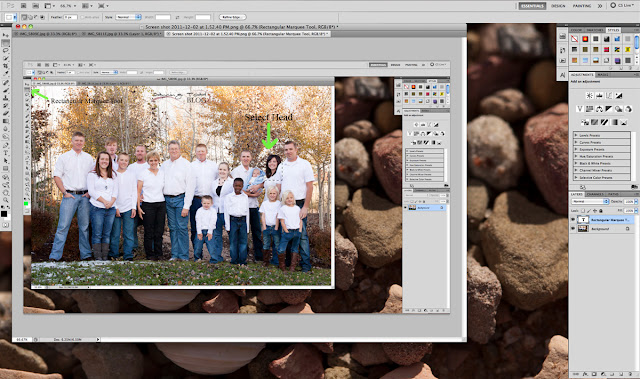
Now go to the other image, the one you are taking the head from. (Wow that sounds morbid) For me it’s the image with her eyes open. Select the Rectangular Marquee tool. (Shortcut: M)
Then, with the Marquee tool, select the area around head.
Then, with the Marquee tool, select the area around head.
Now select the Move tool (Shortcut: V) and click (and hold the mouse button down) on the head selection and drag it to the top of the screen and hold your cursor, while still holding your left mouse button down, over the tab of the other image, the one you are moving this head into. For me I move it to the tab of the image where she has her eyes closed.
Hold your cursor down over that tab until that image is automatically opened, then (while still holding your mouse button down), drag the square down over the head you are correcting.
After you have dropped the new face over the one you are correcting, zoom in (Shortcut: Command + for MAC, CTRL + for PC) and try to get the square lined up with the rest of her body. Zooming in just makes it easier to see if you are all lined up.
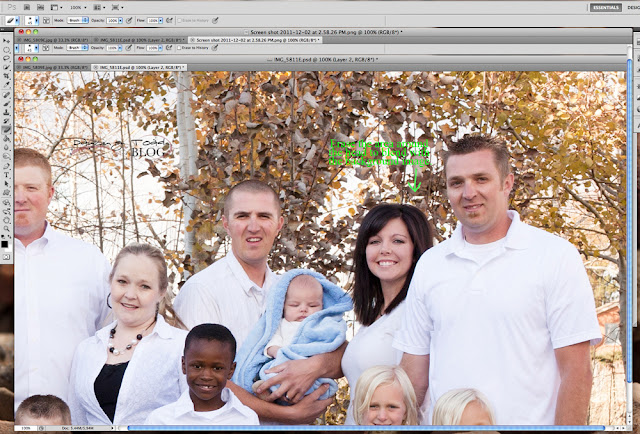
Now, if it’s all lined up just select the Eraser tool (Shortcut: E). If you look closely you can see the square around her head where you dropped the image. By erasing the area that is directly around her head you will better blend the head to the new image, so it’s not obvious that you swapped heads.
If you can’t read that text above, it says: Erase the area around the head to blend with the background image.
There you have it. Her head is officially swapped.
Wow. That was a long post. I hope it’s understandable. It’s super hard to explain some of those steps! Let me know if you try it and have any questions! Once you get used to it, it’s super super easy peasy.
See you all next month!
Thanks for checking out this post from www.SugarBeeCrafts.com – – click on over to read it in its entirety – you’ll love it!


Good tip, Lizzie!