Did you see my Monogram Wall Hanging entry for “yarn” week over at SoYouThinkYou’reCrafty?? If not, that post is towards the bottom of this one – – but first a quick how-to….
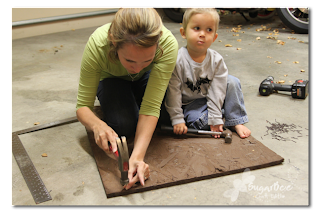
Paint a board, any board. Any color. Mark where you will put nails in all around the edge – I think mine were 1 1/2 inches apart – the closer they are together, the more yarn you will have on your wall hanging. Be sure to have lots of helpers to add to the chaos.
Hammer nails on the marks you made. I used “paneling nails” because they came in brown. Be sure to have a helper that likes to spill the box of nails and grab your hammer – it’s more fun that way (okay, maybe not..)
Had to show this picture because my helper was practicing her photography skills – way to aim focus on the nail!
Keep going. Give your helper his own hammer. It will solve a lot of problems (and cause a lot more problems….)
Tie the yarn to one nail. Then start wrapping. I used 2 colors and wrapped one color for awhile and then the other for awhile. Be creative – this is the fun part! Just tie off your yarn when you’re all done.
Now for the monogram part. I cut the shape I wanted out of paper, then put it where I wanted it. I then nailed nails (longer ones than before) all around the “W” outline. Then I wrapped a different color thread on the “W” part – and with this one I wound yarn around the outline to make it more defined.
And that’s it – to hang it we just nailed right through the board onto the wall – you can’t see the nails because they’re under the yarn. Here’s the post from the competition:
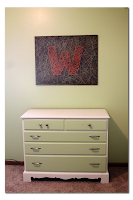
My toddler is growing up – time to convert the nursery to a big boy room. To compliment the colors I’ll be using on his bedding, I made a Monogram Yarn Wall Hanging to display above his dresser.
This idea has so many possibilities – grab any color of yarn and you have a custom wall hanging for any room. Older children/teen may enjoy making it themselves. It can add a pop of art in a family room.
When I was taking pictures, my 8-yr-old son walked by and said “that’s really cool mom!” and later that day my daughter said “can we make one for my room?” – gotta LOVE when my crafts are a hit with my kids!
And to wrap it up here’s a boring picture of it in my toddler’s room. I have another, bigger/wider dresser that will go under it, as soon as I paint it (maybe navy blue, maybe orange – I can’t decide) and then I’ll get to adding some accessories and pulling the room together – but the Monogram Wall Yarn Hanging is definitely the focal point of the room.


Thanks for the tute! I love this wall-hanging, and I voted for you on SYTYC!
I’ve been waiting for this tutorial. 🙂 I follow SYTYC every week and knew that I had to make this when I saw it. Thanks so much for sharing the tutorial. I will be checking your blog regularly now.
This looks cool! Thanks for the instructions
I did one of these in high school, only it was a snail instead of a monogram! The teacher should have had us do those and maybe I would still have it! (and I would go with and orange dresser!)
I love this. Thanks for explaining how you did it! Might have to add this to my list of things to make!
Oh my goodness, what a great idea. I know some kiddos that would love to help make one for themselves. Thanks for sharing!
https://delectableflair.blogspot.com
Haha! Thanks for explaining how to do it. I did wonder how you got the “W” on there. And I loved all your helpers and the narration of how well it went having them help!
love this tutorial. Looks like you had some pretty fabulous helpers!
Really great idea! Especially for a boy! You are so very inventive!
That is sooooo cool!!! I’m thinking my kids are going to love it too! Thanks so much for sharing!
This is so clever! Thanks for linking up to Fantabulous Friday!
that is a really nifty monogram! a trip down memory lane for me! this string art is definitely making a come-back isn’t it? i remember my older brother making one as a project when I was little. that was… ahem… 30 years ago…
i adore YOUR take on it and the fact that your kids were so “involved”. love it!
Great job! You’ve brought back many wonderful memories for me! When I was a child, my parents both made these. Some of them were amazingly intricate and beautiful. I just wish some of them had survived for us to enjoy today.
that looks like so much fun! i want to do something like this with my son!!! thanks for sharing!
Mandy this is awesome! Fantastic idea and I love the colors you used. I featured this on the Sunday Showcase Round Up. Thanks so much for joining in the fun! Stop by and grab a featured button if you like. Hope you are enjoying your week ~ Stephanie Lynn
I love this!! I just saw it in the Sunday Showcase Roundup. The center initial is brilliant!
Kristin – The Goat
this looks so cool. i love it! great job.
that is so cool! very creative!
I love this project… it’s so awesome! Thanks for linking up to our YARN IT ALL party! :]
I LOVE this. Actually, I totally had this project in mind when I was thinking of starting the “Yarn it all” series. 🙂 I think it turned out amazing. 🙂 Thanks for linking it!
Too funny! I got back to your blog through the yarn it all party, and realized i loved your blog and then realized again that I was already a follower….this is the second time i have done that with you! You are totally out there in the linking world with great original projects!
this is such a great idea! I love it!